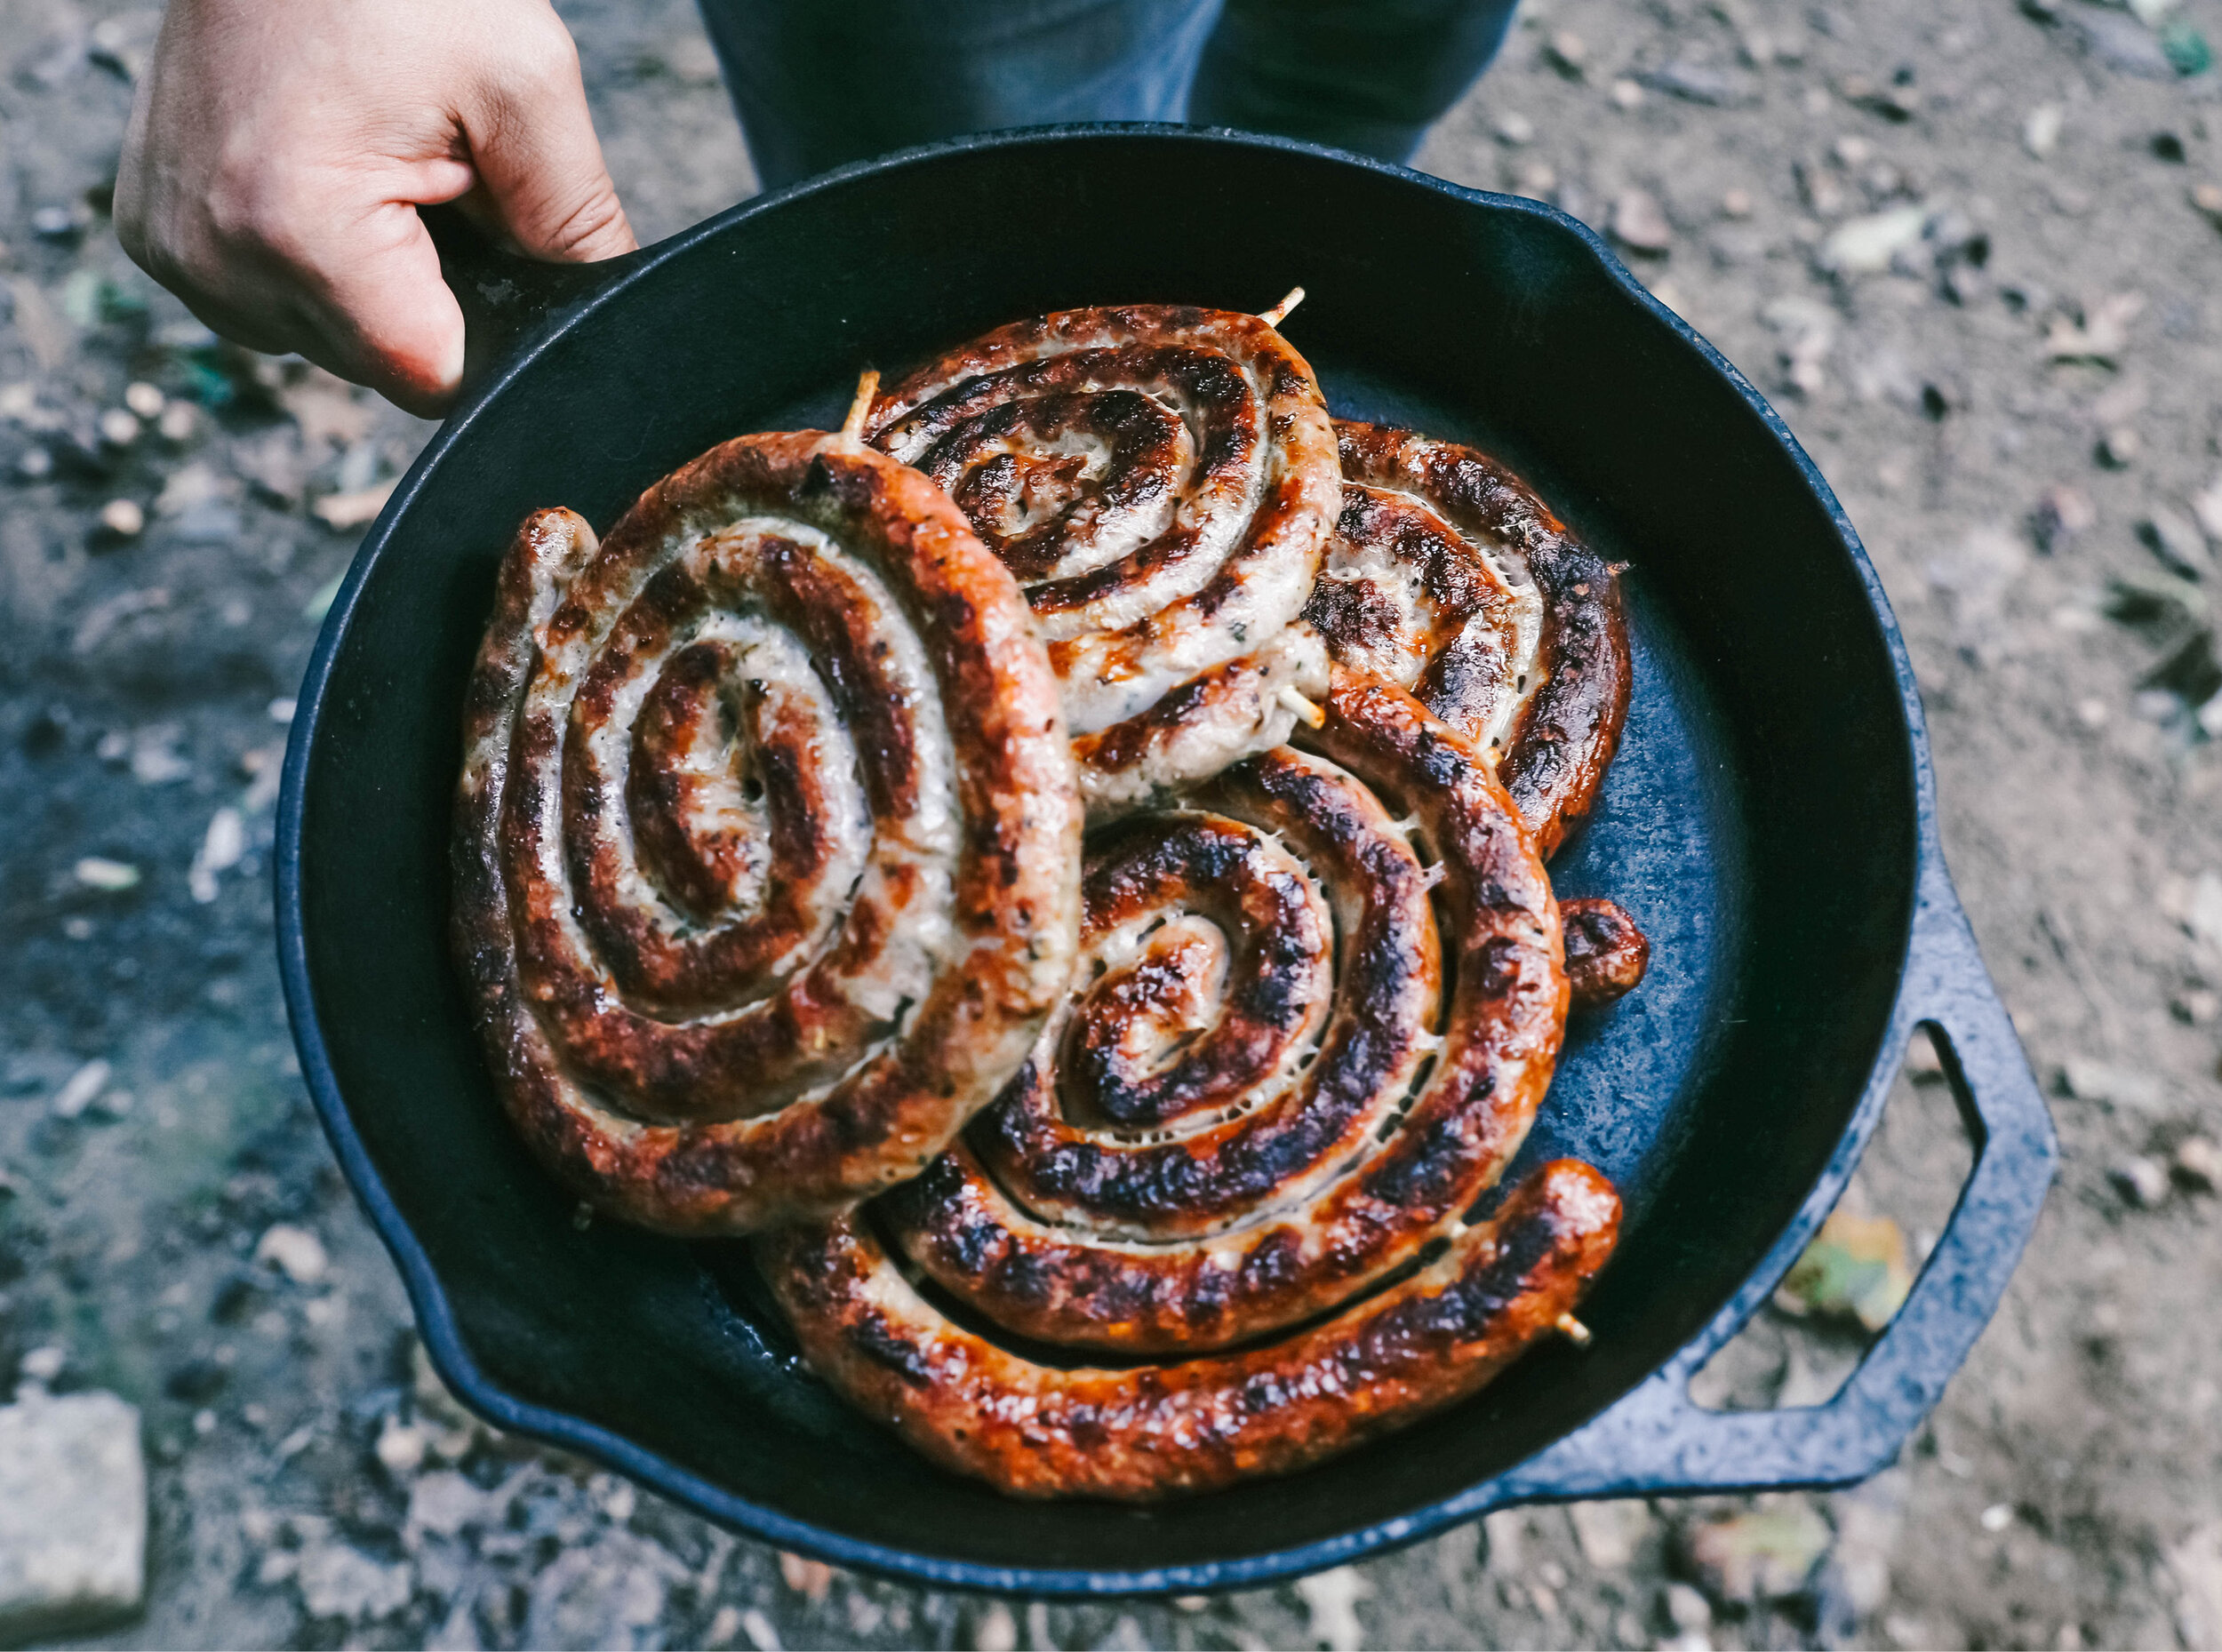
Web Resized.jpg

Boerewors

This recipe has two parts - the sausage itself & then properly braaiing the boerewors.

Boerewors = Coiled farmers sausage. Boer (farmer) wors (sausage). It’s generally defined as a coiled sausage that must be at least 90% meat and always contains beef. It can also include pork, lamb or a mixture of both. No more than 30% of the meat content may be fat. The remaining 10% consists of spices and other flavor enhancers.

TIP:

If you have a butcher that will custom make this for you, here is the recipe. We find that as long as you agree to order at least 8 lbs, they will happily do it. These freeze very well. You want a natural casing, preferably sheep. Approx. 33/34 mm is the right diameter, but you can go bigger or smaller if you’d like. 

This really is an art, as many people tend to badly overcook their sausage. Here, you are making a very high end wors – enjoy it. Overcooking and drying it out defeats the whole purpose of braaiing something special. Industrial sausages can often be less than 15% protein and are just packed with water, filler and cheap fat. These are really nice. They should be treated no differently than a gorgeous steak.

Ingredients:

  • 3 lb beef (pastured if possible)

  • 3 lb pork (pastured if possible)

  • 1 lb pork belly (pastured if possible)

  • ½ cup red vinegar + splash

  • 6 tbsp Worcestershire

  • 1 clove garlic

  • 3 tbsp salt

  • 3 tsp black pepper

  • 3 ½ tbsp coriander (this is an important part of the spice profile)

  • 1 tsp nutmeg

  • 1 tbsp thyme

  • 1 tsp allspice

  • ¾ tsp cloves

You do not want a fine grind on these. Something a bit courser is more authentic. 

Directions: 

Bring coiled boerewors to room temperature. This will allow for more even cooking.

It’s important your braai is ready and only working with smoldering coals. If there are flames, when any fat drips from the boerewors, you will end up with fat smoke. That does not taste, or smell very nice.

Once the coals are hot and ready, place the boerewors onto the braai. If you’d like, a braai basket is a great tool as well. 

As with most items on the braai, let it talk to you. Don’t rush it. Enjoy a glass of Braai Pinotage. Don’t walk away from your braai, but don’t stare at it either. The wors will tell you they are not ready if they stick to the braai when you try to flip them. If they flip easily, they are telling you to go for it.

From here, you are two thirds finished. Watch the boerewors. Touch them with your finger to gauge how soft/hard they are. If they are getting hard, you cooked them too long. Also, remember, when you pull them off and let them set they will still cook. You don’t want it to feel soft at all, just medium firm.  

Remove from braai and cover with foil. Wait 5 minutes or so. A hot boerewors is GOLD, so don’t let them get cold. 

To us, a proper braai includes quality knives and having a cutting board on hand - perfect for serving these. Slice them into 3 inch lengths and let everyone eat with their fingers!


Web Resized_.jpg

Braaibroodjies

Servings: 4 sandwiches

Ingredients:

  • butter

  • chutney

  • 8 slices of good-quality bread

  • 8 slices of cheddar cheese

  • 4-8 fresh sliced tomatoes

  • 2-3 large onion sliced

  • braai or barbecue basket

DIrections:

Prepare the braai with medium-high heat.

Butter the outside of each sandwich.

Spread the chutney on the inside top of each sandwich.

Assemble the sandwiches: 2 slices of cheese, sliced tomatoes and onions.

Place the four sandwiches inside a braai or barbecue basket and slowly grill until they are golden brown and the cheese has melted, about 2 minutes or more per side, depending on the braai.


Web Resized4.jpg

Braai Burgers

Servings: 6 burgers

Ingredients:

  • ¼ cup chopped fresh flat leaf Italian parsley

  • ½ cup grated Pecorino Romano

  • ¾ tsp salt

  • ¾ tsp freshly ground black pepper

  • 1 tbsp garlic (1-2 cloves)

  • 1 pound ground beef

  • Pinch of red paper flakes

  • Fresh tomato slices for topping

  • Sliced feta cheese 

  • 6 pitas or rolls

Directions:

In a large bowl combine the cheese, parsley, salt, pepper and garlic. Stir to combine. Add the beef and stir until incorporated. Divide the mixture into 6 (1-inch) thick burgers. 

Preheat grill for medium heat. Brush grill grate with cooking spray or olive oil. Grill burgers 5 minutes on each side, or until cooked to desired doneness. Serve burgers wrapped in pitas or on rolls, with tomatoes and feta cheese. 


Web Resized5.jpg

Braai Rub

INGREDIENTS:

  • 3 tsp hungarian paprika

  • 2½ tsp salt

  • 2 tsp ancho chile

  • 2 tsp chipotle

  • 1 tsp cumin

  • 1 tsp mustard seed

  • 1 tsp coriander

  • 1 tsp turmeric

  • 1 tsp lemon pepper

  • ¾ tsp garlic

  • ½ tsp cayenne

Directions:

Mix all of the ingredients together and use the rub to season your favorite meat.


Braai+Master+Beef+Fillet+and+Creamy+Brown+Mushroom+Sauce.jpg


Creamy Brown Mushrooms

This recipe was provided by Braai Master Scott Young.

Ingredients:

  • 2x large punnets of the best brown mushrooms (portobello mushrooms are a good option)

  • 2 onions

  • 4 cloves of garlic

  • 1 single cream

  • red wine

  • dijon mustard

  • lots of black pepper

  • salt

Directions:

  1. Slowly pan fry 1-2 large onions in butter.

  2. Once soft and yellow, add 4 diced garlic cloves. Don't burn the onion or garlic.

  3. Add the sliced mushrooms and allow to soften and cook slowly.

  4. Once there is some liquid and the mushrooms have softened, add some red wine, and turn up the heat to reduce further.

  5. Turn down the temperature and add the cream. Allow to blend for 10 min.

  6. Add lots of black pepper! And salt to taste.

  7. Add 1-2 teaspoons of mustard for a more interesting flavour.

  8. Serve with med-rare sliced fillet!


shutterstock_589049216.jpg

Garlic and herb marinade

This recipe was provided by Braai Master Jiri Krejcir.

Ingredients:

  • 6-8 cloves fresh garlic

  • 1 shallot or 1/4 onion

  • 2 scallions or a small bunch of chives

  • 1 nice bunch parsley (I prefer curly French but flat Italian works fine.)

  • 2 tbsp Herbs de Provence

  • 1.5 tbsp Salt (Borsari original seasoning salt)

  • 1 tsp pepper

  • 1 pint canola oil

  • (Other fresh herbs can be added — for example: cilantro, basil, oregano, marjoram, chervil, tarragon, thyme, rosemary) —depending on what you are making and what you like.

Directions:

Chop the garlic, onions, shallots and/or scallions – not too rough or fine, sort of medium. Chop the parsley fine. Keep refrigerated.

Mix all the ingredients with the oil and use it to marinate beef, pork, chicken or lamb.

Make sure all sides of the meats are coated and that it is either submerged or covered with plastic wrap to keep air from drying it out. You can marinate in this for a few hours to several days. The flavors are great and the oil that penetrates the meat makes it juicy.

Make sure to wipe off excess oil before you put it on the grill to avoid flare ups.

Click here for Jiri’s Marinated Country Style Pork Ribs recipe, which uses this Garlic and Herb Marinade.


117262818_127005379095963_171969591076681705_n.jpg
117435717_109685334085614_8563358341430875416_n.jpg


Grand Champion Ribs

This recipe was provided by Braai Master Derek Richards.

Ingredients:

Directions:

  1. Fire up the Bronco to 250 degrees.

  2. To prepare the ribs, remove membrane and use mustard as a binding for both sides of the ribs.

  3. Season the ribs with Tomahawk Seasoning Co. Bullseye Blend.

  4. Put hanging hooks into the ribs put into the smoker.

  5. After 1 hour of hanging, spray the ribs with apple juice, close the top, and let them hang for another hour.

  6. After 2 hours of hanging, spray them again and begin to wrap the ribs in aluminum foil.

  7. Lay sheets of aluminum foil flat, add some brown sugar and Captain Rodney’s Boucan Glaze.

  8. Ribs go meat side down, and back onto the Bronco.

  9. After another 45 minutes to 1 hour, check the ribs for tenderness, pull back and disintegrate.

  10. That’s about it! Very simple and limited ingredients. Give it a try!


Braai-1115.jpg

grilled fruit

Ingredients: 

  • fruit (watermelon, pineapple, peaches, nectarines, bananas, pears, grapefruit, plums, cantaloupe, strawberries - many types of fruit can work!) 

  • olive oil

  • course sea salt

  • freshly ground pepper 

  • skewers (optional)

Directions: 

Heat your braai to medium heat.

Toss the fruit of your choice in olive oil, adding salt and pepper. If you are going to skewer your fruit, do so now. You can also put larger pieces directly on the braai grates.

Fruit cooks very quickly so keep a close eye.

Grilled fruit is amazing on its own, as a snack or as dessert alongside ice cream. It is also brilliant in a salad to make it a main. For a sweeter twist, honey can be drizzled. Lemon or lime juice can be used to brighten the flavors. Glazed balsamic also works well on sweeter fruits like watermelon or strawberries for a savory spin. Fresh herbs can also be used to garnish - we like rosemary a lot here.


shutterstock_699999457.jpg

Grilled Octopus

Servings: 4

ingredients:

  • 4 lb octopus

  • 1 clove garlic, thinly sliced. Want more garlic, go for two

  • ½ tsp rep pepper flakes

  • zest of 1 lemon

  • ¼ cup torn parsley leaves

  • 4-6 tbsp red wine vinegar

  • Optional - salad accompaniments

Directions:

Buy your octopus fresh. Braise it for 2.5 hours in a deep pan at 250 degrees. No need to salt it or doing anything. Just get it on the pan, foil it tightly and braise. Even 3 hours is fine! Take it out, pat it down dry and cut off the legs into longer pieces.

Next, make your marinade by combining garlic, red pepper flakes, zest, parsley and the red wine vinegar in a bowl. Add the octopus legs and marinate for a full 48 hours. The key here is that the marinade needs to be acid based so it can really work overnight. If there is too much olive oil, it gets cold in the fridge and coagulates. You want this to be a vinegar based liquid so overnight it really breaks down that octopus.

Then its easy! Light the braai, pour a class of wine and put a cast iron on the braai to get very hot. Really, the octopus is already cooked, so you just need to braai for grill marks and smoke. We like to get a nice char, slice it up and serve it two ways - longer pieces like you would get at a great restaurant and then we make a salad with the chopped up body. Lots of chopped olives, garlic, oil, salt - parsley is nice too. 


Snapseed (3).jpg


Grilled Tri-Tip

This recipe was provided by Braai Master Chuck Matto.

Ingredients:

  • 1 tri-tip roast

  • salt, pepper, and garlic

Directions:

Stir salt, black pepper, and garlic together in a bowl. Coat meat with salt, pepper, garlic mix and let rest for 1 hour at room temperature. 

Heat your smoker/grill to 275°F.

Cook, flipping tri-tip every 10-12 minutes until internal temperature is 123°F.

Let rest 15 minutes before serving. Be sure to cut against the grain.

Pair with your favorite Braai wine for the perfect treat!


IMG_1860.jpg

Krewe Du Que Pulled Pork

This recipe was provided by Braai Master Aaron Borst.

Try out this pulled pork recipe for your friends and family or the next time you’re feeding a large crowd!

Servings: Around 10 people. Leftovers can be frozen.
Cooking time: 7-9 hours

Ingredients:

Injection:

  • 2 1/2 cups apple juice (high quality refrigerated - "Simply Apple" or similar)

  • 3/4 and 1/8 cup turbinado sugar

  • 1/8 cup dark brown sugar

  • 3/4 cup white vinegar (can substitute with apple cider if preferred)

  • 1/8 cup kosher or sea salt 

Meat, etc.:

  • 1 bone-in pork butt (aka Boston Butt), about 9-10 pounds

  • 1/3 - 1/2 cup of any commercial / homemade  BBQ Rub (avoid coffee-based rub for this)

  • 2 chunks smoking wood for smoke (I prefer Cherry)

  • Bread (e.g. Hawaiian rolls, hamburger buns, favorite crusty bread)

  • 2-1/2 to 3 cups of your favorite BBQ Sauce 

  • 3/4 cup apple juice

  • Sandwich toppings of your choice (e.g. onion, pickle - even try a little mayo, trust me)

Other needed or helpful supplies:

  • 1 grill or smoker

  • 2 BBQ Wood Chunks (Cherry, Apple, Pecan, Oak or Hickory recommended)

  • 1 meat/marinade injector

  • 1 meat thermometer

  • 1 leave-in digital oven or grill thermometer

  • 1 disposable foil baking pan

  • Heavy Duty Aluminum Foil 

  • Oven Mitts 

  • Spray Bottle

  • Cooking Oil

  • Plastic Wrap

Directions:

  1. Prepare Injection: (Prepare the day before you plan to cook. See “Dry Brine” under step #2 as an alternative to using an injection.  Do not use both).  Place injection ingredients into a sauce pan over medium heat.  Heat ingredients until well incorporated. (Do not boil)  Place into a container (mason jar or similar) and allow to cool before refrigerating. (Do not use injection while warm).  

  2. Meat Prep (up to one day in advance): Remove any obvious sinew, bone shards, etc.  Not much trimming should be required.  Leave fat on bottom of meat (if fat is very thick, trim to approximately 1/4 inch) 

    • Injection approach:  Inject meat the night before, or at least 2 hours before cooking.  Place meat in a foil baking pan to catch excess injection. Pick 9 evenly spaced points across the pork butt to apply injection.  Move the needle around in several directions at each point to deliver as much injection as the meat will hold.  Tip: Cover the injection hole as you remove the needle to avoid injection coming back at you!  Dispose of excess injection in the pan.  Drain excess injection in pan. Dispose of any unused injection. Cover pan in plastic wrap and place in refrigerator until ready to cook.

    • Dry brine approach:  If not injecting, use a “dry brine” to get salt into the meat before cooking.  Make sure meat is moist so salt will adhere when applied (you can apply little water to the surface if needed). Simply coat the meat in kosher salt (approx 1/2 tsp per pound, or “eyeball it” if comfortable).  Wrap in plastic wrap and place in refrigerator in the pan overnight.

  3. The Cook: Fire up your grill or smoker targeting a stable 275 - 300 temperature. If using a grill, use a two-zone set-up (see online tutorials) and place a small water pan filled with warm water (e.g. bread pan) over the direct heat charcoal section.  Remove meat from fridge, drain excess injection / juices (if applicable).  Apply a thin layer of cooking oil to meat prior to applying a BBQ rub. Then generously apply BBQ rub to meat.  Pat down the dry rub so it’s slightly “pressed” into the meat (don’t “rub” it on).  Let meat rest uncovered for ~30 minutes or until the rub looks moist / "tacky".  While meat is resting, place 2 wood chunks on coals of the grill/smoker.  Fill spray bottle with 1/2 apple juice and 1/2 Apple Cider Vinegar (measurements not in ingredients section).

    • Place meat fat side down on grill/smoker (cool side of two zone grill set-up). Cover and allow to cook/smoke.  After 2 hours, check meat.  Use spray bottle to lightly moisten any part of the meat that looks dry (rotate meat if one side is browning faster than the other).  Continue cooking, checking and spraying any dry looking meat every half hour until the meat  develops a nice Mahogany color over the entire surface that doesn’t scratch off (a.k.a. the “bark” - see picture for example of appearance).  If certain sections still look “mushy” or bark scratches off, it needs more time cooking uncovered to create a stable bark surface.  Once that is achieved, move to the next step.  Combine 1/4 cup BBQ sauce with 1/4 cup apple juice and warm prior to the next step.

    • Remove meat from grill/smoker and place into foil baking pan. Evenly pour warm BBQ sauce / apple juice combination over meat.  Insert grill/oven thermometer probe into thickest portion of meat at the center.  Cover tightly with 2 sheets aluminum foil (careful not to pierce the foil with probe) and return to smoker. Continue cooking at 275F  for 2 - 3 hours, or until internal temp has hit 203 F.  At 203 F, remove from smoker and probe meat  through the foil for tenderness.  If tender (very little resistance to probing - just slightly tighter than probing a room temp stick of butter), rest meat  uncovered for 15-20 min, or until internal temperature has hit approx 190F. If not tender, quickly keep covered in foil and return to smoker.  Check for tenderness again after another 30 minutes.

  4. Finishing Steps

    • After resting meat, coat exterior with 3/4 cup of your favorite BBQ sauce  thinned out with remaining 1/4 cup apple juice (1 cup total - I prefer a sweeter Kansas City style sauce for this), strain and reserve juices from pan (skim fat if needed). 

    • Place meat back on smoker for ~15 to 20 minutes to “set the sauce”.   After setting sauce, keep meat in foil pan and pull out the bone (should remove easily and cleanly if properly cooked/ tender).  Gently pull pork apart while in pan using large forks or hands (with proper protective gloves - Hot!).  Remove anything that looks or feels like something you wouldn’t want to eat (remaining bottom layer of fat, bone shards, membrane, etc) Drizzle reserved pan juices over the meat while pulling.  

    • Once pulled, apply favorite BBQ sauce while in pan to taste (I prefer a thinner, tangy style sauce for this step such as Blues Hog Tennessee Red or other "Carolina" Style sauce.  Use some sweet Kansas City style if you prefer a sweeter pulled pork). 

    • Make sandwiches and enjoy!  (Pair with preferred garnish e.g. onion, jalapeño...I love diced dill pickle and a touch of mayo.  Mayo sounds nuts, but it lends a creaminess and marries all the flavors together, give it a try!)


Web Resized-12.jpg

Lemon Garlic Braai Shrimp 

Servings: 6

Ingredients:

  • 2 lbs jumbo wild, shelled, de-veined uncooked large shrimp
    (We don’t recommend small or medium for the grill. They will cook too fast and are a little harder to skewer/manage the extra skewers on the braai. 2 lbs is about 24 shrimp.)

  • 4 oz butter (+ a little extra just in case!)

  • freshly minced garlic (several generous spoonfuls)

  • crushed red pepper

  • 3 lemons

  • kosher salt

  • skewers

Directions:

Rinse your shrimp and pat them dry. If you did not buy de-veined or de-shelled, this must be done now. Once they are rinsed and dried, place them in a large mixing bowl. 

In a saucepan heat 4 oz of butter (keep some nearby just in case you need a little more). As that heats mix in a few hefty spoonfuls of freshly minced garlic, and a few hearty shakes of crushed red pepper. You are working visually here, so no need to be exacting. If you want spicier, add more red pepper. If you’d like it more buttery, go heavier on the butter. 

Mix those in until hot but not scorched. Stay close, as this all happens fast.

Squeeze the juice of two lemons over the shrimp along with some kosher salt.  Be generous and mix well. 

Pour the butter/garlic/crushed red pepper over the shrimp and mix well.  Use your hands as you will do a better job and will get them messy anyway when you skewer the shrimp next.

We like to utilize reusable stainless steel skewers. They are longer, stronger and easier to work with as they have a handle.  Skewer the mixed shrimp - no more than 6 (jumbo) or 8 (large) per skewer. If they are too long or too heavy they are hard to work with when on the fire.

With a medium + hot braai, lay each skewer over the grate. The wood smoke will envelope them quickly as some of that butter drips. The smoke/butter/garlic combo creates serious magic.

The key to shrimp is not to walk away. Don’t stare at it, but have a glass of Braai wine handy so you can sip, but not leave. Shrimp cooks very quickly on the braai. Visually you will see them go from soft/translucent to pink, firming up quickly. This could be as quickly as two minutes. Three maybe. As they firm, with an oven mit (metal skewers have a handle), give them a flip. They should turn easily. Or, use braai tongs - whatever feels right to you.

Once flipped it will only be two minutes more. It’s a fine line here, as no one wants a soft shrimp. You want them to be firm, but not rubbery. All in it’s perhaps a five minute braai.

These shrimp are a great way to get a proper braai started. It’s a nice snack while you work on some bigger cuts for the main meal. OR, these are gorgeous on a fresh green salad as the main attraction.

Squeeze some more lemon on them and you are ready to go! 


Web Resized3.jpg

Lamb Koftas

Servings: 12-15 skewers

These are impossibly easy to make and everyone loves them. Quick too! You can also blend lamb and beef if preferable.

Ingredients: 

  • 2 lbs ground lamb (freshly ground – ask your butcher, pastured) 

  • 2 eggs (organic, pastured)

  • 2 good sized onions, finely chopped.  (A small chop is very important for this step.)

  • 4-6 cloves garlic, crushed.  (We’re big fans of more is more here..)

  • 2 tsp cumin (ensure the spices are as fresh as can be)

  • 2-3 tsp of turmeric (We like going a little heavier on this one)

  • 4 tsp ground coriander 

  • ½ ounce of finely chopped fresh coriander

  • 1 lemon (juice and zest)

  • course sea salt

  • freshly ground pepper 

  • 12-15 wooden skewers

Directions: 

Everything goes into one mixing bowl together:

  • Meat

  • Onions

  • Eggs

  • Everything else

Don’t be afraid to salt these.  

Mix well. It’s easier to do this at room temperature.  

Start to shape them like you would a meatball, but think longer and much more oval. You have to skewer them, so you need some thickness (3/4 of an inch thick and 6 inches long is a good guide)

Skewer the koftas. Leave enough space on the skewer to hold and flip them while braaiing.

Get your braai hot. Place skewers on the braai, but don’t crowd them. Leave enough space for the heat and smoke to float around them. Do not braai too many at once, as lamb fat can make it too smokey if you are not careful.

Now, the most important part. DO NOT FLIP until the first side is firm. Don’t be in a rush. Pour a glass of Braai Cabernet and relax. If you try to flip them too early the meat will stick to the braai and tear off the skewer.

When it’s firming up and ready (you can always pull up one side gently to see if it happily flips or sticks) flip it. From here it’s fast as the kofta is two thirds done. Test for doneness by gently pressing on it. If it’s too soft and not done it could rip. Too hard and you overcooked your lamb. Go slow. It’s a journey. You can always cook one first, just to see how it goes and to get the timing right. By taking this route you also get a hot one to eat alongside your awesome Braai Cab while the others cook.


shutterstock_494931046 (1).jpg

Marinated Country Style Pork Ribs

This recipe was provided by Braai Master Jiri Krejcir.

Ingredients:

  • 12oz of bone in country style ribs

  • salt and pepper

  • garlic and herb marinade (see here)

  • smoked paprika

Directions:

Country style pork ribs are from the rib end of a pork loin near the shoulder. The meat is darker and juicy so it will not dry out. It is also an inexpensive cut which makes it great for get togethers with friends and family.

Trim the meat of any fat and bones that are attached loosely or excessive. Lightly salt and pepper the meat and cover liberally with the marinade for at least 3-4 hours but you can leave them in for a few days so it can be prepared in advance.

When your grill is hot, remove the meat from the marinade and wipe off excess marinade to avoid flare ups. Sprinkle with some smoke paprika and put them on the grill on low to medium heat. Cook until well done, about 25-40 minutes depending on the thickness, You want the meat to be cooked through and come apart easily. As it is dark meat it will stay juicy.

Serve with standard cook out sides like bread and salads. You can enjoy them as they are or with BBQ sauce.


Web Resized2.jpg

Peri Peri Chicken

Servings: 2

Ingredients:

  • 4 chicken breasts

  • 5 tbsp Braai Rub

  • 1 cup fresh lemon juice

  • 1 tbsp olive oil

  • Splash of Braai Cabernet Sauvignon or Pinotage

Directions:

In a large bowl, stir together the Braai Rub, olive oil, wine and lemon juice. Rub the chicken with the mixture, place it on a dish and marinate for 3 hours, turning occasionally to coat. Pre-heat grill on medium heat. Grill chicken until slightly charred and juices run clear. Discard marinade.


shutterstock_494931046 (1).jpg

Rump Steak

This recipe was provided by Braai Master Tiaan Jordaan.

Ingredients:

  • rump steak

  • mustard powder

  • salt

  • lemon juice

Directions:

Place a rump steak on a very hot wood fire.

Sprinkle a little mustard powder and salt on each side, 4 minutes a side. Only turn once.

Leave for 5 minutes to breathe.

Cut in strips and cover with lemon juice.

Serve as a with drinks was the perfect starter to any braai.


91dc1964120315.5ac77335ae374.png


Simply Perfect Pork Ribs

This recipe was provided by Braai Master Chuck Matto.

Ingredients:

  • 1 rack baby back ribs

  • "This Thing of Ours" garlic pepper rub or salt pepper and garlic

  • 1/2 cup BBQ sauce

Directions:

Begin by removing the membrane on the back of the ribs.

Season both sides of the ribs with your garlic pepper combo.

Prepare your smoker to 250°F using post oak wood or whatever wood you like.

Place the seasoned ribs on the smoker and close the lid. 

Leave them to smoke for 3 hours. Brush with sauce and let smoke 20 more minutes. (If you don't have a heat shield and are cooking directly over the fire, flip and rotate ribs every 20 minutes to get an even cook and color across the rack of ribs.)

Slice and immediately serve with your favorite bottle of Braai Wine!


Web Resized2.jpg

Steak on the Braai

TIP:

This dish is simple, no real recipe! Just thoughtfulness. The quality of the meat is EVERYTHING. A low quality steak will still be low quality even if braaied brilliantly. We recommend you work with thick cut steaks. They are more forgiving and allow you extra time to relax by the braai. Thick cut steaks also offer a better range of doneness for your guests. If you can buy thick cut pastured beef, amazing. 

Ingredients: 

  • thick cut steaks

  • avocado oil

  • kosher salt

  • pepper

prep:

  • Bring the steaks to room temperature.

  • Rub liberally with avocado oil (olive oil is a carcinogen at the temperatures we plan to braai at)

  • Salt and pepper the meat. We like course ground kosher salt.  

  • Use your hands to rub in the salt and pepper. Then salt a little more for looks.

directions:

There are two ways to do this, both equally fun and sure to deliver superb results.  

OPTION 1

Place the steak on a very hot braai.  It’s important you know your braai. Know where the hot spots are and know where it runs cooler.  We like to start very hot for side one, then move to a cooler spot to finish. The meat will tell you when it’s time to flip it.  When it flips easy, right at that first moment it’s time to flip it. A specific time cannot be suggested because every steak is different due to it’s thickness and quality. Put it on, drink some Braai Cab and don’t think about it again for 5 minutes. Then poke around and test a corner.  

Once flipped keep a close eye.  Touch the steak to test for doneness.

Remove steak and place it somewhere where it can be covered in foil to rest.  This is very important, as if you cut it right away, the juices will not have had time to redistribute inside the steak and will just pour out of it. What a waste! Let it set - another chance to enjoy your Braai Cabernet. 

Every quality Braai Master has at least one great cutting board and knife they love. We use Japanese steel (Yoshihiro) - it’s endlessly re-sharpenable and durable. A Braai steak carved and served on a cutting board is perfect.  Don’t forget to only slice against the grain.  

OPTION 2

We LOVE to work with cast iron when it comes to steak. Place your cast iron pan or chapa (just a flat piece of steel or cast iron) on your braai. Get it HOT. We use a Big Green Egg, so its easy to get that cast iron to 600 degrees. 500 is fine! Once the pan is hot, put the steak on and sear that first side.  It only takes a few minutes. This is how you get the crust great steakhouses reference. 

Then flip the steak. Now, you can keep it in the cast iron or move it directly to the braai grate. Up to you. We like a crust side on one side and a softer side on the other, so we often move it to the grate. This also allows you to play with two techniques throughout the process.  

Another benefit to only using cast iron on one side is that you can still get the all important grill marks from the grate on the other side!

Follow the instructions from Option 1 for removing, setting and serving.


Web Resized-1.jpg

Whole Fish on the Braai

Servings: 4

Tip:

First you need a great place to buy fish. Get this right and you are half done. Fish needs to be very fresh. It should have no odor at all. The eyes should be clear. Buy it from a reputable place that can prep the fish for you. This includes cleaning (gutting), scaling and removing the gills. At that point, it’s grill ready. We really like to braai red snapper and think of a 3lb fish as plenty for 4 adults. For a wood fire, the meatier and thicker the whole fish, the more forgiving the process will be as it pertains to cooking it well without over drying it.  

Ingredients:

  • 3 lb fish of your choice

  • high quality olive oil

  • kosher salt (the rougher cut/chunkier the better)

  • lemons

  • fresh garlic

  • finely chopped parsley

  • finely chopped thyme.  

Directions:

Most likely you will not rush right home and braai after you buy your fish, so it will end up in the fridge for a bit. To that end, bring it out of the fridge at least 30 minutes before you plan to braai.

What we love about all of this is that if the ingredients are right, you are going to have a beautiful dinner. It’s also fast, so if you have side dishes, get to work on those first. After you have taken the fish out of the fridge and let it set to room temp the whole process for prep and braai may only take 20 minutes.  

Rub the entire fish down with olive oil. Stuff the inside with your garlic, lemons and chopped herbs. Lastly coat the exterior with the kosher salt.

That’s it.  

Now - the fire. We like the braai at 400 degrees or so.  It’s a fine line between medium + and high heat.  Lean towards medium +.  Lay the fish on it’s side, either directly on the grate or in a fish/braai basket. Wait 7-8 minutes for a 3 lb fish. Like everything on the braai, it will let you know when it’s ok to flip.  If it’s hard to flip or sticking, it’s not time.

Flip. If you have a basket, this is easy - just grab your oven mit, hold the handle and flip. Without a basket, this will take some artistry with the largest spatula (or even two) that you have. Go slow.

Wait another 7 minutes. Check the meat with a fork. When it is white, flaky and medium firm, you are golden. Place onto a large cutting board or baking sheet - something that will capture the water from the fish as it can be messy.

Let it sit for a few and then carve. Go slow here and use a sharp, thin knife. Think of the fish as two sided (as it is); slicing the meat from one side (we work from tail to head) fully and then flipping it to do the other side. The slower you go here, the less bones will end up on your guests plates.